Resizing images sounds simple, but doing it incorrectly can lead to blurry photos, rejected uploads, or poor print quality. Whether you’re attaching images to an email, uploading a resume, or printing flyers and certificates, understanding how image resizing works can save time and frustration. This guide explains how to resize images without losing quality, while also breaking down important concepts like DPI, pixels vs inches, and why resizing properly matters.
Why Image Resizing Matters More Than You Think
Most platforms—email clients, job portals, and printers—have strict image size requirements. Uploading an image that’s too large can result in rejection or compression, while an image that’s too small can look pixelated or unprofessional. Proper resizing ensures your image meets the exact dimensions and resolution required, preserving clarity and detail.
Unlike cropping, which removes parts of an image, resizing adjusts the image dimensions proportionally. When done correctly, resizing maintains visual sharpness while optimizing the file size for the intended use.
Understanding Pixels, Inches, and DPI (Simply Explained)
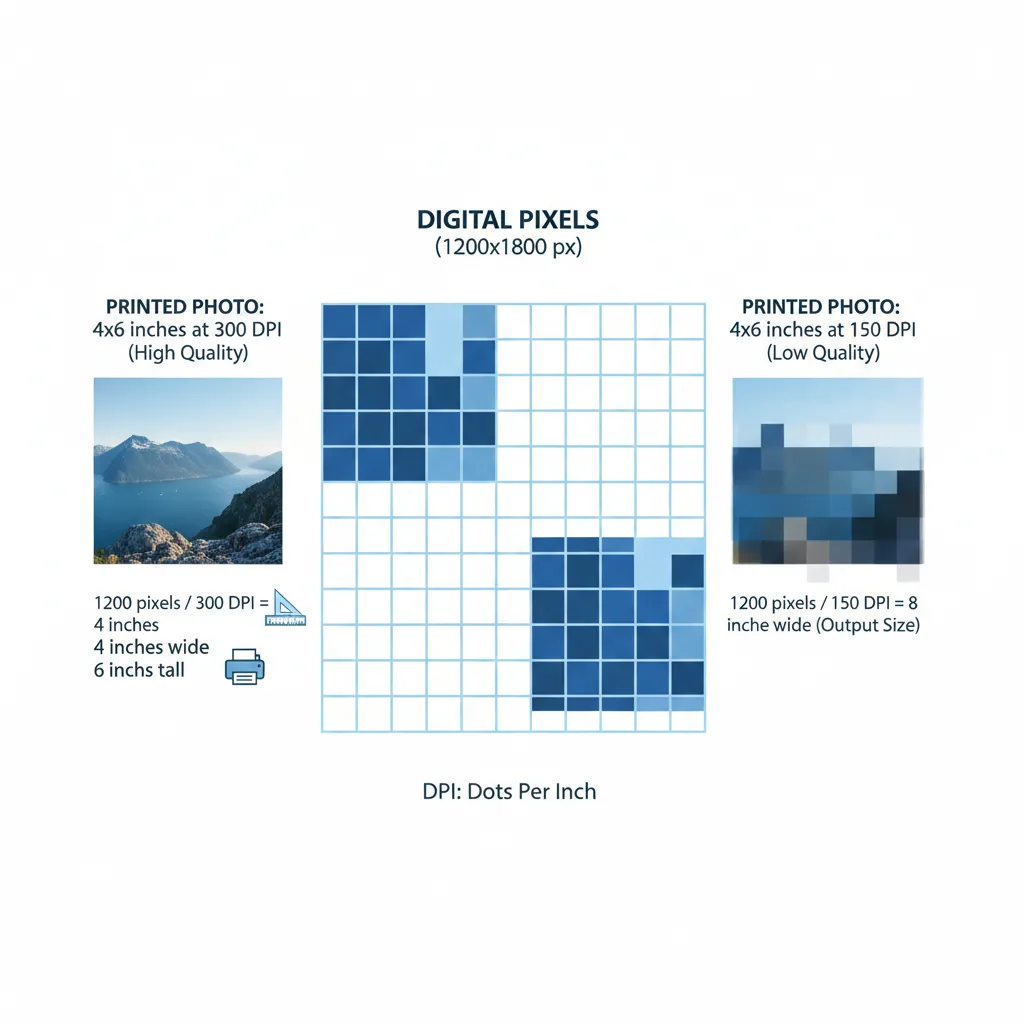
Pixels are the smallest units that make up a digital image. When an image is described as 1200 × 1800 pixels, it means it has 1200 pixels in width and 1800 pixels in height. Inches, on the other hand, are used mainly for printing. The missing link between pixels and inches is DPI, or dots per inch.
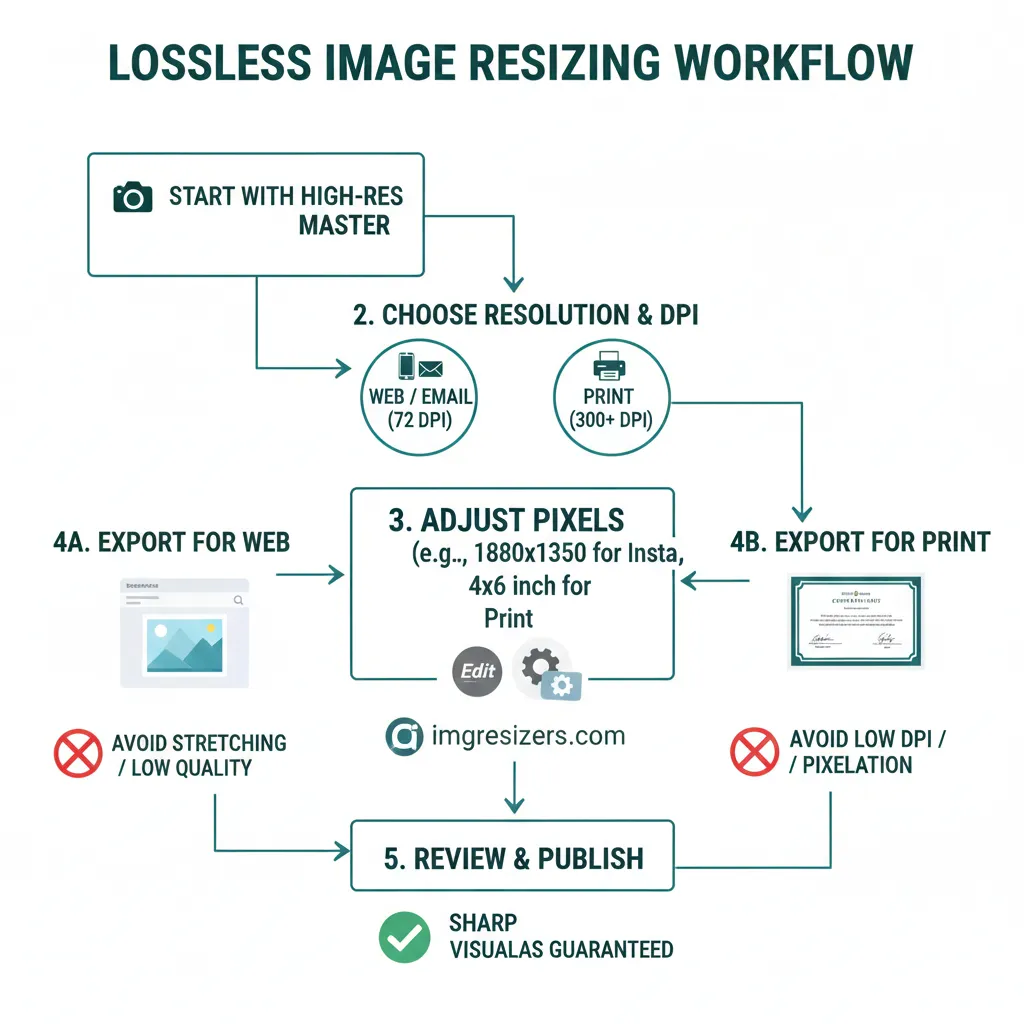
DPI determines how many pixels are printed per inch on paper. For example, an image that is 1200 × 1800 pixels printed at 300 DPI will result in a 4 × 6 inch photo. The same image printed at 150 DPI would be larger in physical size but less sharp. This is why DPI is critical for printing but mostly irrelevant for emails and online uploads.
Resizing images correctly involves adjusting pixel dimensions while keeping the DPI appropriate for the final output. This balance prevents blur, stretching, and quality loss.
Resizing Images for Email Attachments
Email platforms often limit attachment sizes, usually between 10 MB and 25 MB. High-resolution images straight from a camera or phone can easily exceed these limits. When resizing images for email, the goal is to reduce file size while keeping the image clear on screens.
For emails, a DPI of 72 or 96 is sufficient, as screens display images based on pixels, not print resolution. Resizing the image to reasonable dimensions—such as 800 to 1200 pixels on the longer side—ensures fast loading and sharp display without unnecessary data.
Proper resizing prevents automatic compression by email services, which often degrades image quality more than manual resizing does.
Resizing Images for Resume and Document Uploads
Resume uploads, application forms, and official documents often require images to be in specific sizes and formats. Passport photos, profile pictures, and scanned certificates are commonly rejected due to incorrect dimensions or oversized files.
In these cases, resizing should focus on precision rather than compression. Maintaining clear facial details, readable text, and correct aspect ratios is essential. For example, if a document requires a photo of a fixed physical size, converting inches to pixels using the correct DPI ensures acceptance.
If you need exact print-ready or upload-ready dimensions, tools like converting images to 3×5 inches (https://imgresizers.com/image-to-3x5) or 3.24×4.25 inches (https://imgresizers.com/image-to-3-24x4-25) help meet formal requirements without trial and error.
Resizing Images for Printing Flyers, Certificates, and Photos
Printing is where image quality matters the most. Unlike screens, printers rely heavily on DPI. For professional-looking prints, a resolution of 300 DPI is considered the standard. Anything lower may appear blurry or pixelated on paper.
When resizing images for print, always decide the physical size first, then resize accordingly. Common print sizes such as 4×6 inches (https://imgresizers.com/image-to-4x6), 5×7 inches (https://imgresizers.com/image-to-5x7), 5×8 inches (https://imgresizers.com/image-to-5x8), and 6×4 inches (https://imgresizers.com/image-to-6x4) require specific pixel dimensions to maintain sharpness at 300 DPI.
Resizing properly ensures that text remains crisp on certificates, colors appear accurate on flyers, and photos retain their fine details. It also avoids the common mistake of stretching small images to larger print sizes, which leads to visible quality loss.
How Resizing Prevents Blur and Rejection
Blur usually happens when an image is enlarged beyond its original resolution. Rejection often occurs when image dimensions or file sizes don’t meet platform requirements. Proper resizing solves both problems by fitting the image precisely to the required size without forcing platforms or printers to auto-adjust it.
By controlling pixel dimensions and DPI yourself, you maintain full control over how the image looks and performs. This proactive approach avoids compression artifacts, distorted proportions, and unnecessary back-and-forth during uploads or printing.
Final Thoughts
Resizing images without losing quality is less about advanced editing and more about understanding where and how the image will be used. Emails need lightweight, screen-optimized images, resumes require accurate dimensions and clarity, and printing demands high DPI and precise sizing.