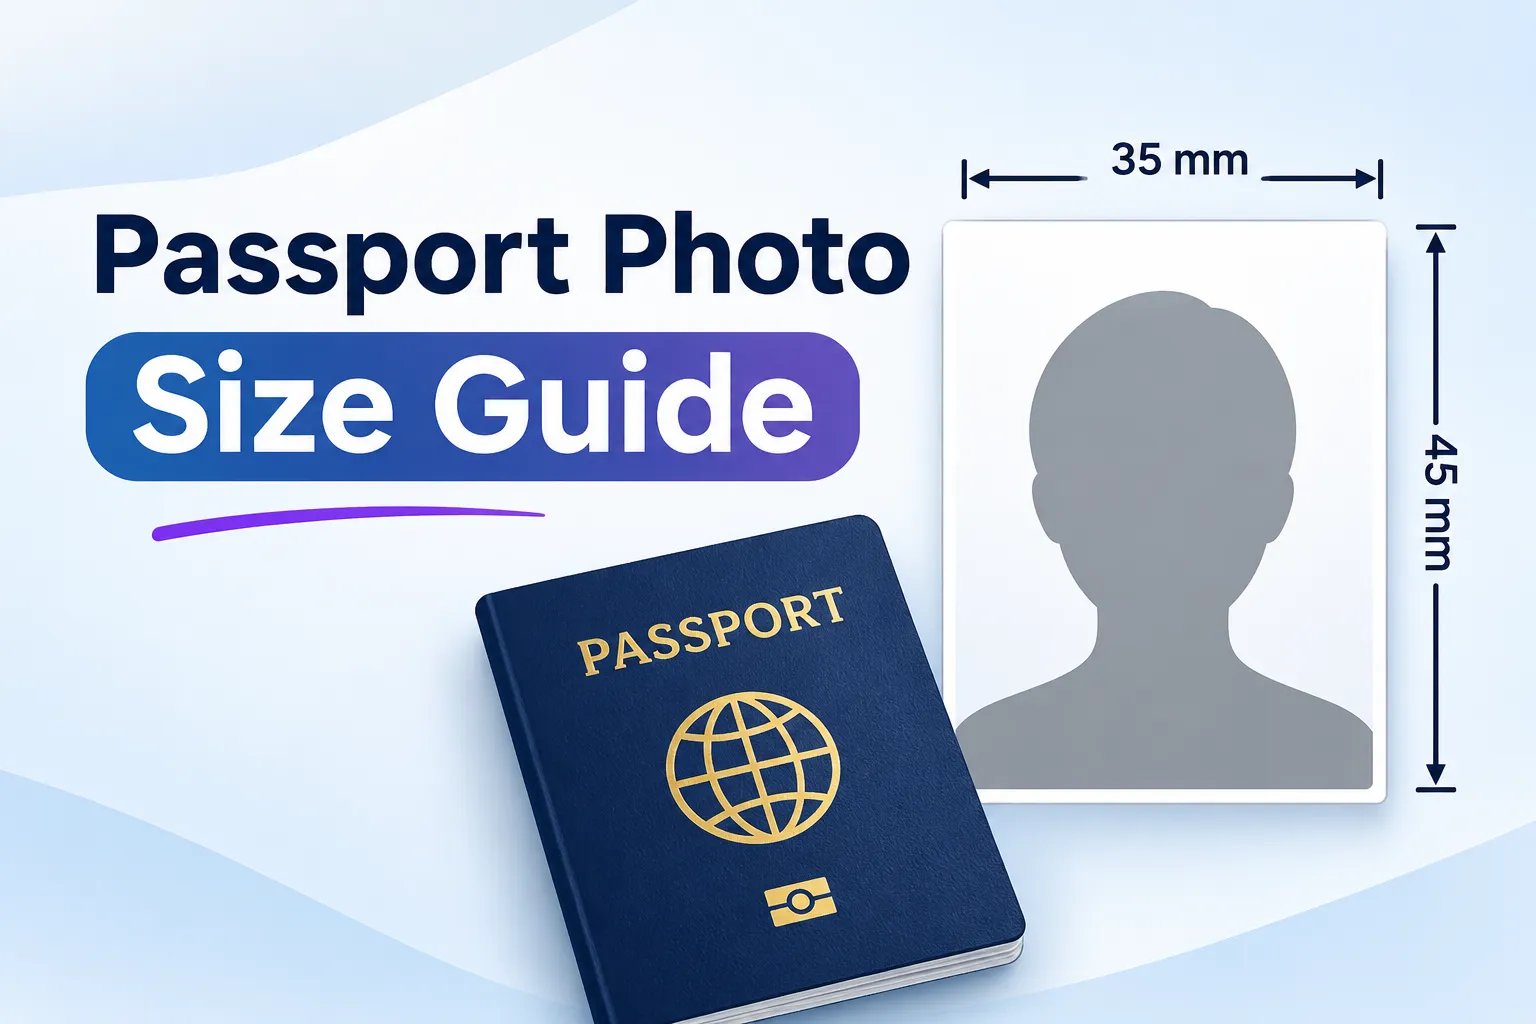
# Passport Photo Size Guide
Passport size sounds like a straightforward instruction until you start preparing the photo. One application asks for millimetres, another uses inches, and an online form wants a file with specific pixel dimensions.
The measurements can be confusing, especially when you already have a photo and just want to know whether it will fit.
There’s no single passport photo size that works everywhere. You need to match the requirements for the passport you’re applying for, including whether you’re submitting a printed photo or uploading a digital one.
Below, you’ll find common photo sizes, an explanation of how pixels relate to print measurements, and a guide to resizing your image when the application rules allow it.
Passport Photo Sizes by Country
Start with the dimensions listed in your application instructions. The table below compares common printed passport photo sizes.
All measurements are shown as width × height.
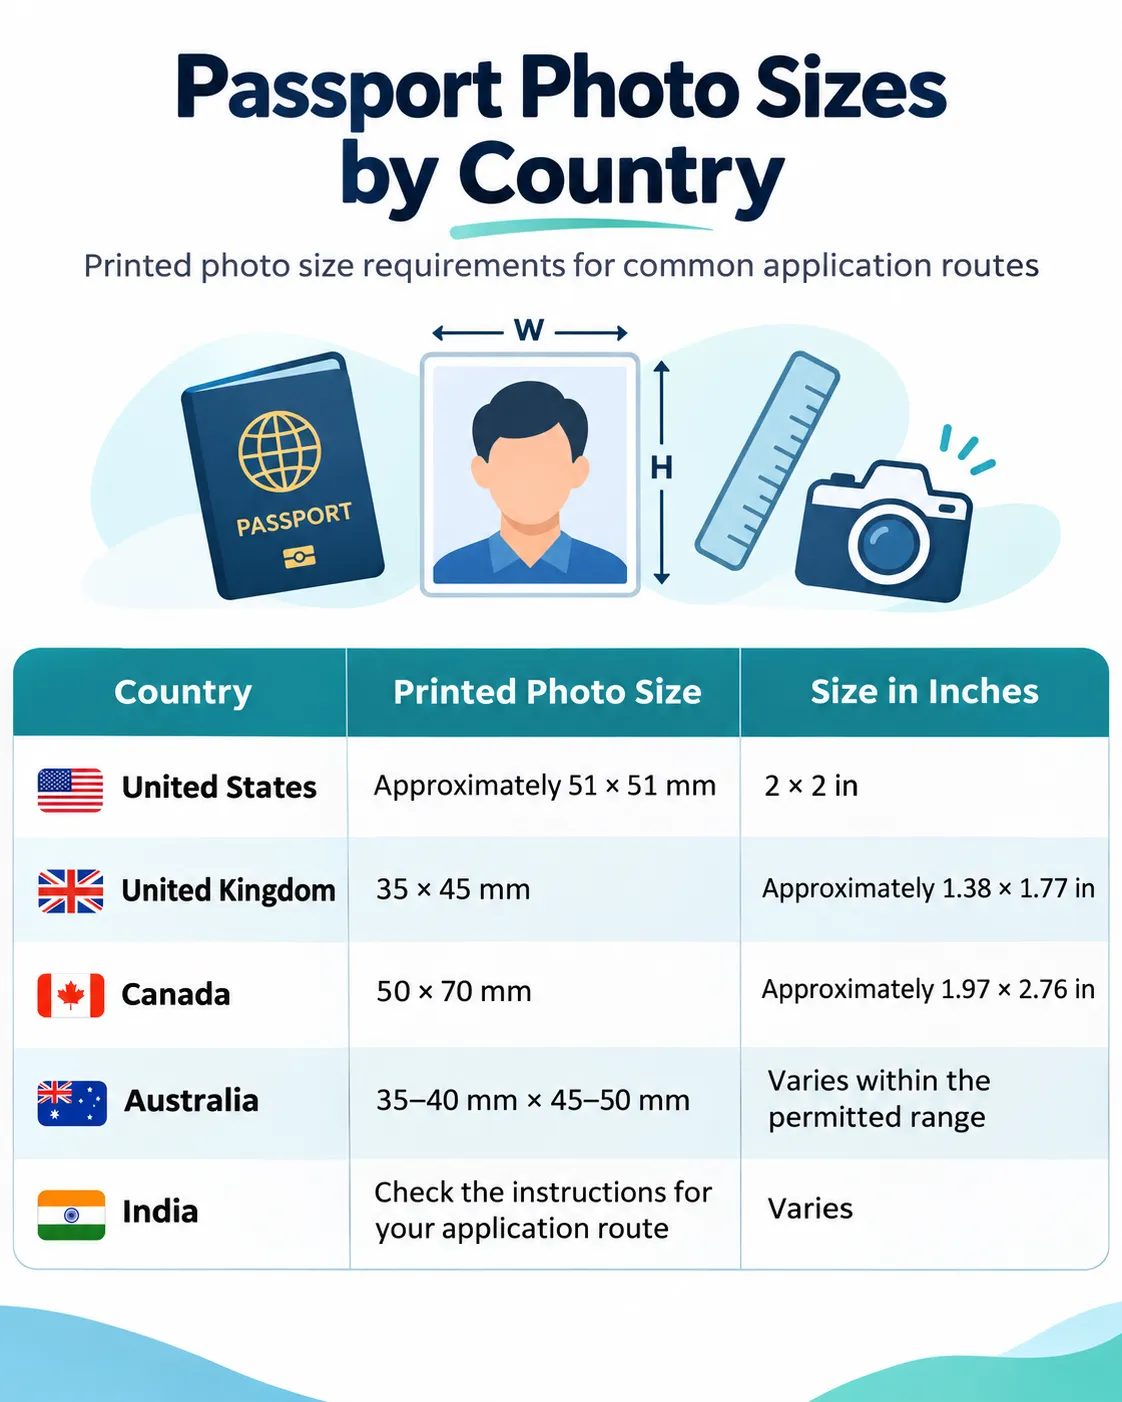
The US, UK, Canadian and Australian passport authorities publish these print dimensions. India’s instructions distinguish between application routes, including those where a separate photograph is not required.
United States Passport Photo Size
A US passport photo must be 2 × 2 inches, with the head measuring 25–35 mm from the bottom of the chin to the top of the head.
Use a clear colour photo with a plain white or off-white background. The US Department of State requires the original, unedited image and prohibits filters and digital changes.
One small detail matters when you calculate pixels: 2 inches equals exactly 50.8 mm. The commonly listed 51 mm measurement is rounded.
United Kingdom Passport Photo Size
For a printed UK passport photo, use 35 × 45 mm. Your head, measured from chin to crown, should be 29–34 mm high.
Online applications have separate requirements. The digital photo must be at least 600 pixels wide and 750 pixels tall, with a file size between 50 KB and 10 MB. A file prepared for printing won’t necessarily meet those upload requirements.
Canada Passport Photo Size
Canadian printed passport photos measure 50 × 70 mm. The face must measure 31–36 mm from chin to crown.
Canada also requires these photos to be taken by a commercial photographer and professionally printed. The image must remain unaltered. If you’re renewing online, follow the separate digital photo requirements for that process.
Australia Passport Photo Size
Australia allows a small range of print sizes:
- Width: 35–40 mm
- Height: 45–50 mm
- Face height, from chin to crown: 32–36 mm
The photo also needs even lighting, a plain white or light grey background, and a clear view of your face. Meeting the outer dimensions alone isn’t enough.
India Passport Photo Size
For India, check how and where you’re applying before preparing a separate photo.
Passport Seva’s application instructions state that a photograph is not required for applications submitted at Passport Seva Kendras and Post Office Passport Seva Kendras. The same instructions specify 35 × 45 mm photographs for certain other submission routes. Use the guidance that applies to your application.
Visa Photos
Visa photos have their own requirements. These two common formats are included for comparison:
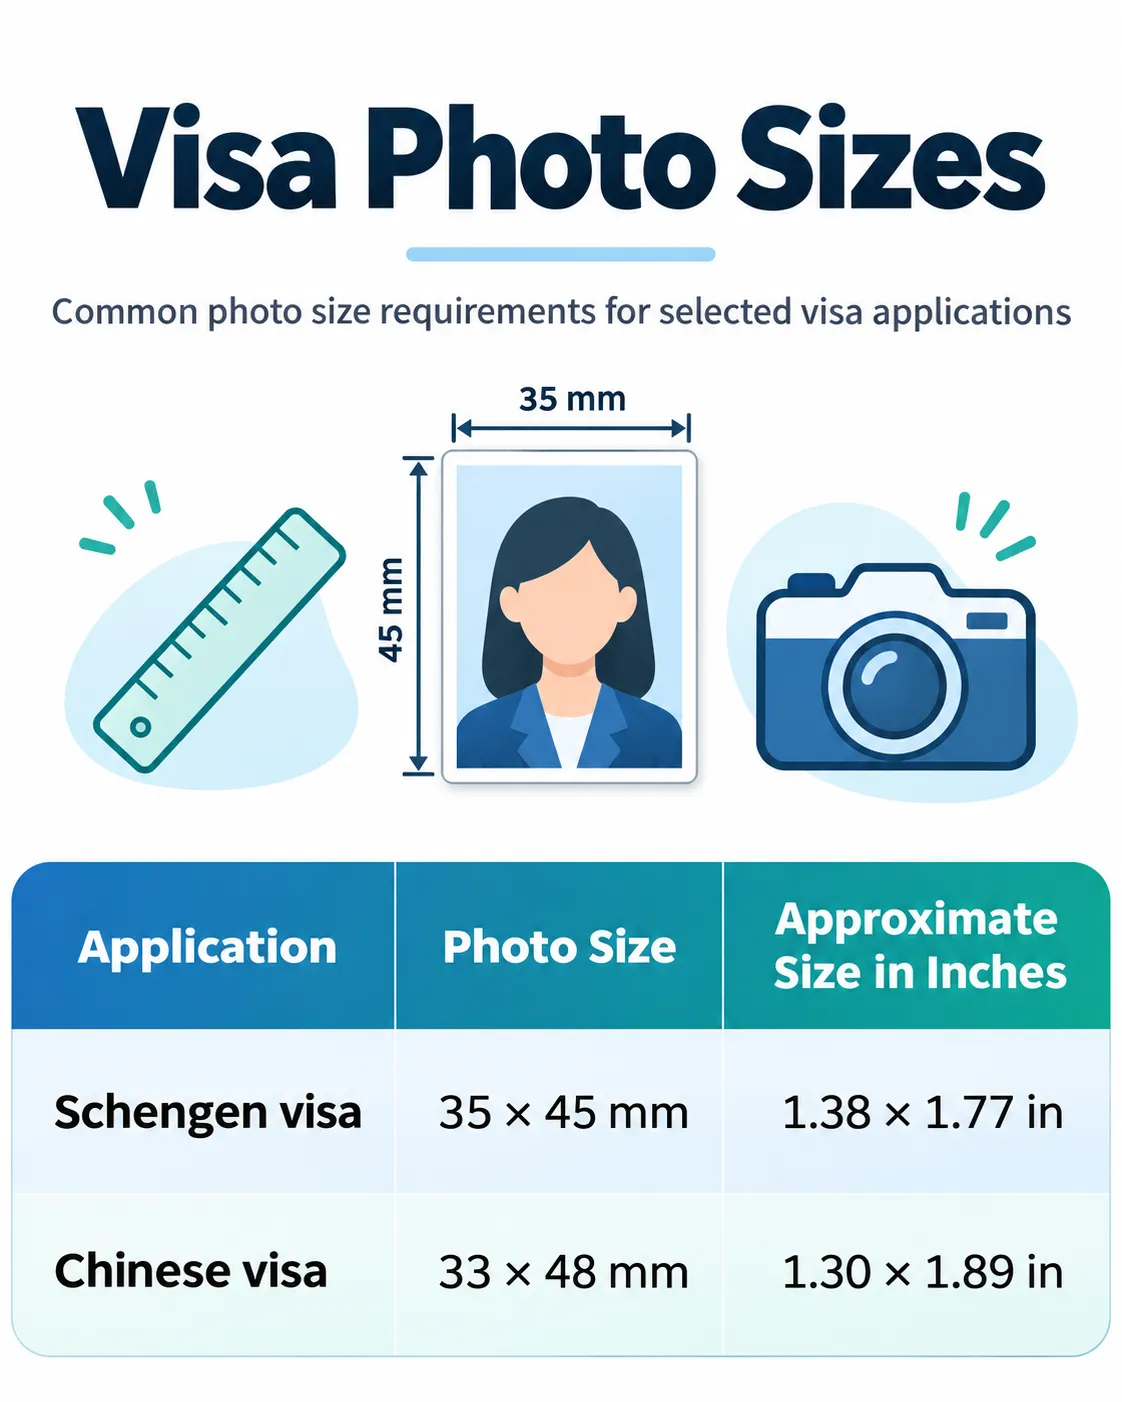
These dimensions come from official visa guidance. Check the instructions for the embassy, consulate, or application service handling your submission before preparing the photo.
Passport Photo Size in Pixels
A measurement such as 35 × 45 mm tells you how large a photo should be on paper. It doesn’t tell you how many pixels the digital file should contain.
To work that out, you need the print resolution: the number of image pixels used for each inch of the print. This is measured in pixels per inch, or PPI. Resizing tools often label the setting DPI.
The following table shows calculated pixel dimensions at several resolutions.
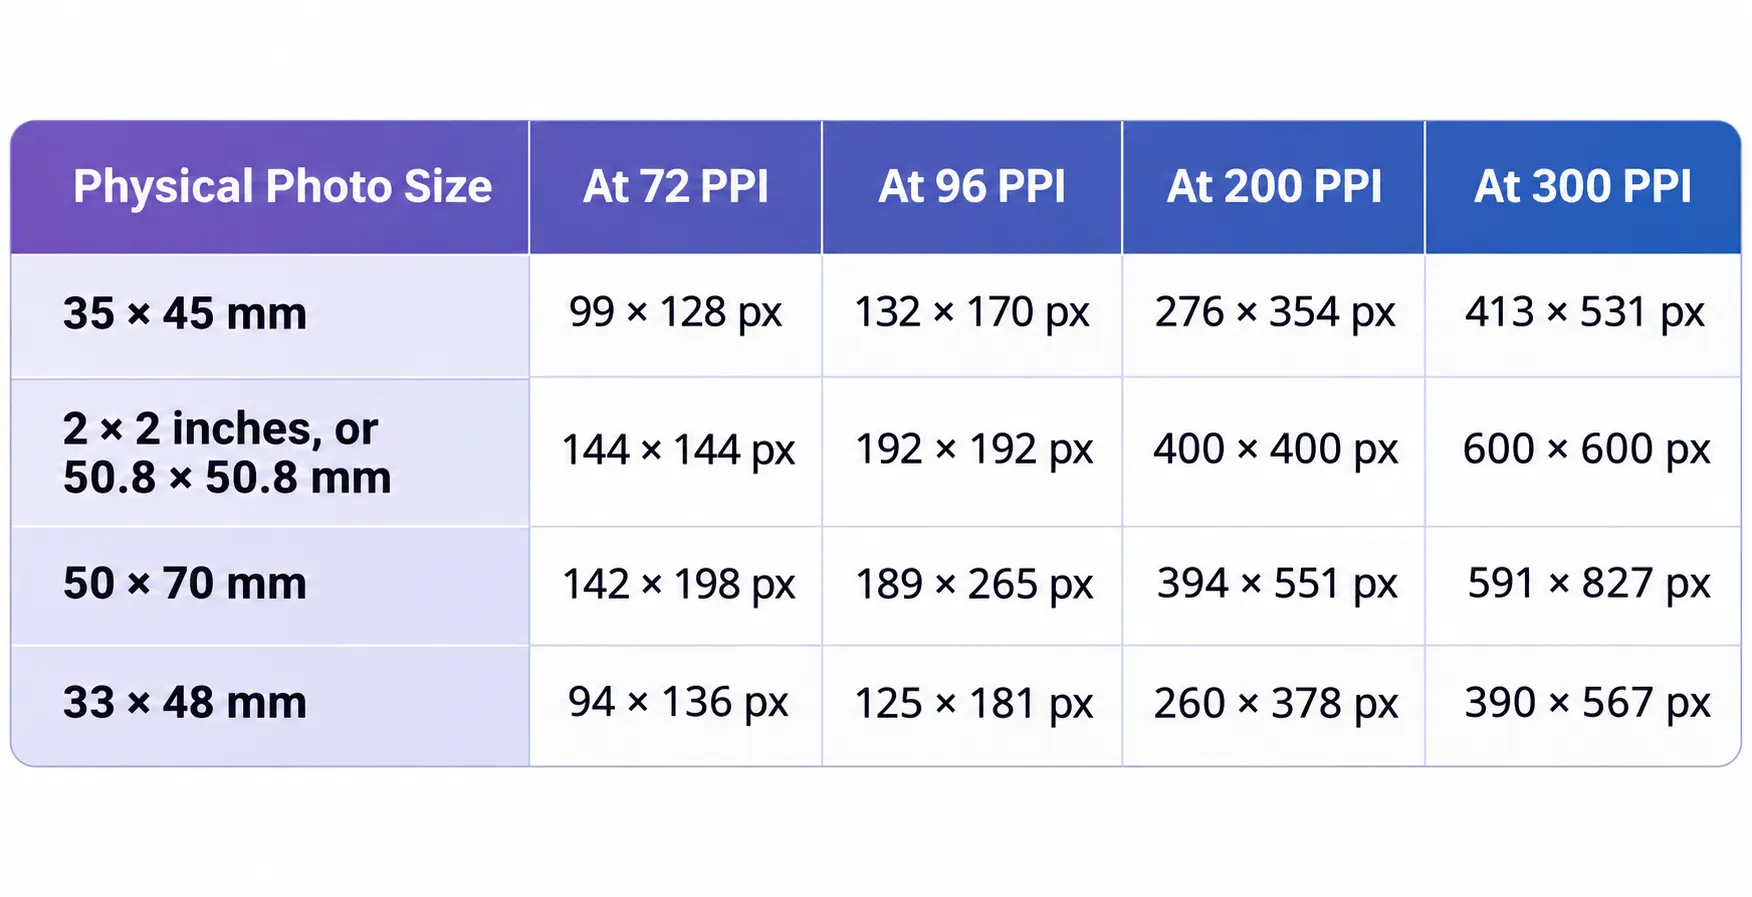
These values are mathematical conversions, rounded to the nearest pixel. They show how print size and resolution relate; they are not official digital upload specifications or recommendations to print at every listed resolution.
For an online application, use the pixel dimensions and file-size limits stated by the passport authority.
How to Convert Passport Photo Dimensions into Pixels
If your instructions give a physical size and a print resolution, you can calculate the pixel dimensions with this formula:
Pixels = (size in millimetres ÷ 25.4) × resolution in PPI
For example, suppose you’re preparing a 35 × 45 mm photo at 300 PPI:
- Width: 35 ÷ 25.4 × 300 ≈ 413 pixels
- Height: 45 ÷ 25.4 × 300 ≈ 531 pixels
The resulting image is approximately 413 × 531 pixels.
If your measurements are already in inches, the calculation is shorter:
Pixels = size in inches × resolution in PPI
A 2 × 2-inch photo at 300 PPI, for example, works out to 600 × 600 pixels.
Passport Photo Size in CM, MM and Inches
You don’t need to convert every measurement into pixels. If your image editor accepts the unit used in your application instructions, you can enter that measurement directly.
These conversions are useful when you need to switch units:
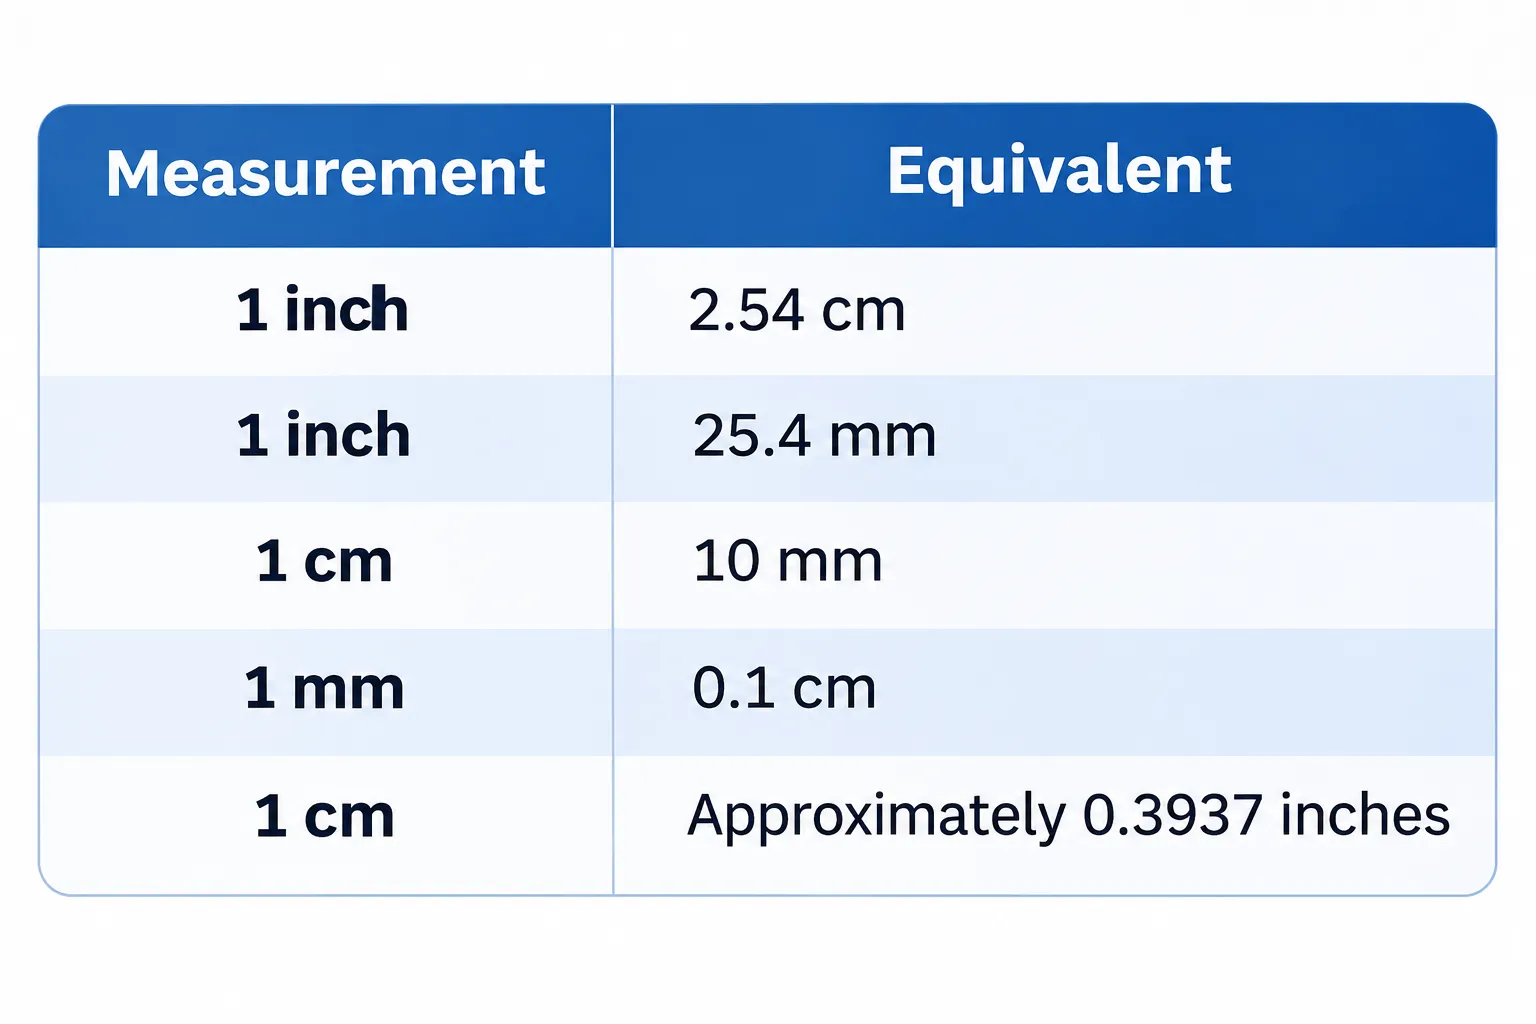
A 35 × 45 mm photo is therefore:
- 3.5 × 4.5 cm
- 35 × 45 mm
- Approximately 1.38 × 1.77 inches
A 2 × 2-inch photo is exactly 5.08 × 5.08 cm, or 50.8 × 50.8 mm.
When entering measurements, check the unit beside the width and height fields. Entering “35” and “45” with centimetres selected produces a very different result from using millimetres.
What’s the Difference Between DPI and Image Size?
Image size usually refers to the number of pixels across and down: 600 × 600 pixels, for example.
Print resolution tells the software how closely to pack those pixels when printing. Strictly speaking, PPI describes image pixels per inch, while DPI describes the dots produced by a printer. You’ll often see DPI used for the resolution setting in an image resizer.
For a 600 × 600-pixel image:
- At 300 PPI, the print measures 2 × 2 inches.
- At 150 PPI, the print measures 4 × 4 inches.
The pixel count stays the same. The intended print size changes.
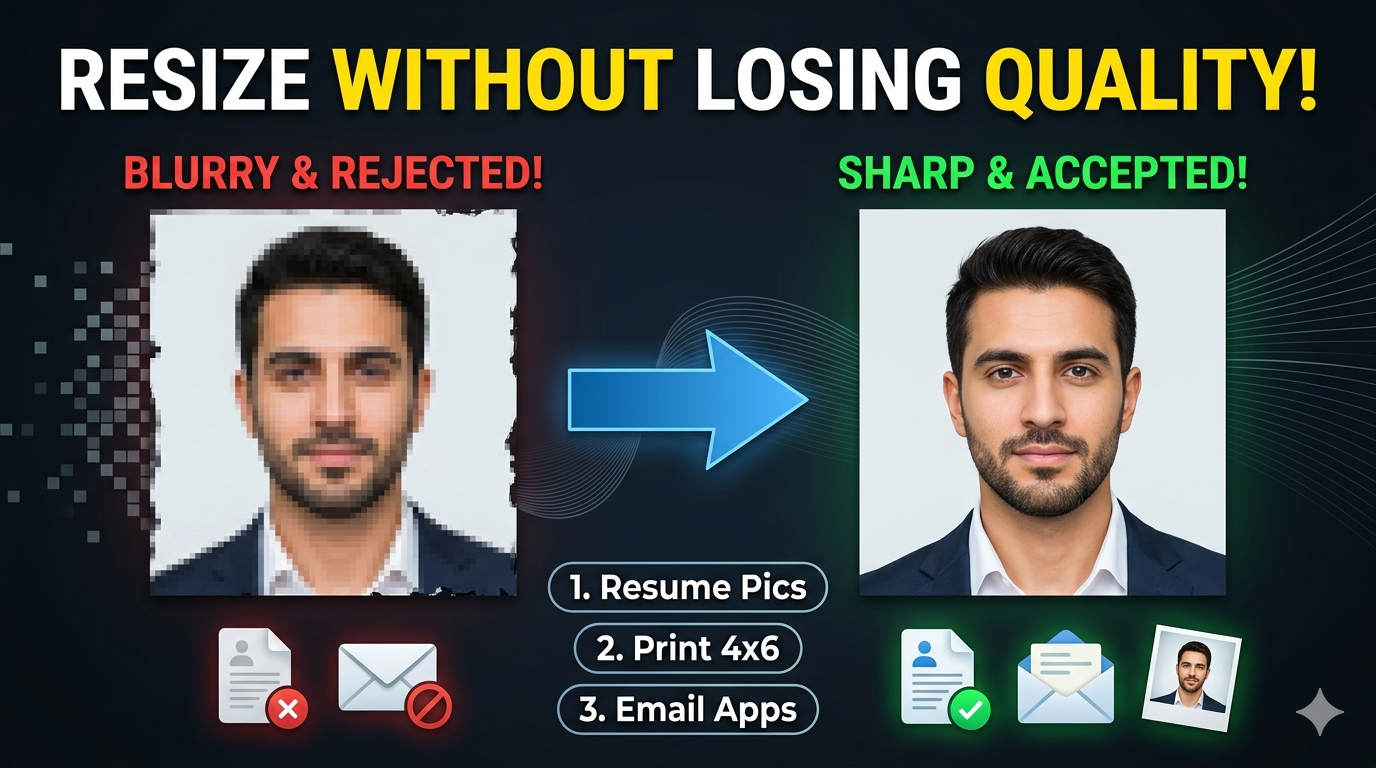
Changing the resolution setting alone won’t sharpen a blurry photo or add missing detail. If you keep the same pixels and increase the PPI value, the image simply prints smaller.
For your passport application, start with the stated requirements. Don’t assume that selecting “300 DPI” is enough to prepare an acceptable photo.
How to Resize a Passport Photo Online
Before resizing, check whether your application permits it. Some authorities require an unchanged image or handle cropping during the application process. For example, the UK tells applicants using their own device for a digital photo not to crop it themselves.
Where resizing is allowed, ImgResizers offers tools for entering dimensions in pixels, centimetres, millimetres and inches, along with a DPI setting. Its custom dimensions tool lets you work with those measurements directly. Change Size of Image Online
Resize Your Photo with ImgResizers
- Open the resizing tool and upload your photograph.
- Select the measurement unit used in your application instructions.
- Enter the required width and height.
- If you’re working with physical print dimensions, set the required resolution.
- Check that the photo’s proportions and head size remain correct.
- Select the required output format and download the image.
- Check the saved file’s dimensions and file size before submitting it.
For a 35 × 45 mm print, for example, you can select millimetres and enter those measurements directly.
Keep the face in its original proportions. Stretching a photo to force it into a different shape can distort the image. If the framing is wrong and the application doesn’t allow you to adjust it, you may need a new photo.
Resizing also won’t fix a background, lighting or editing issue. Canada, for example, requires original passport photos that have not been altered.
Common Passport Photo Mistakes to Avoid
It’s easy to focus on width and height and overlook what’s inside the frame. Head size, lighting, background and image quality also appear in official passport photo requirements.
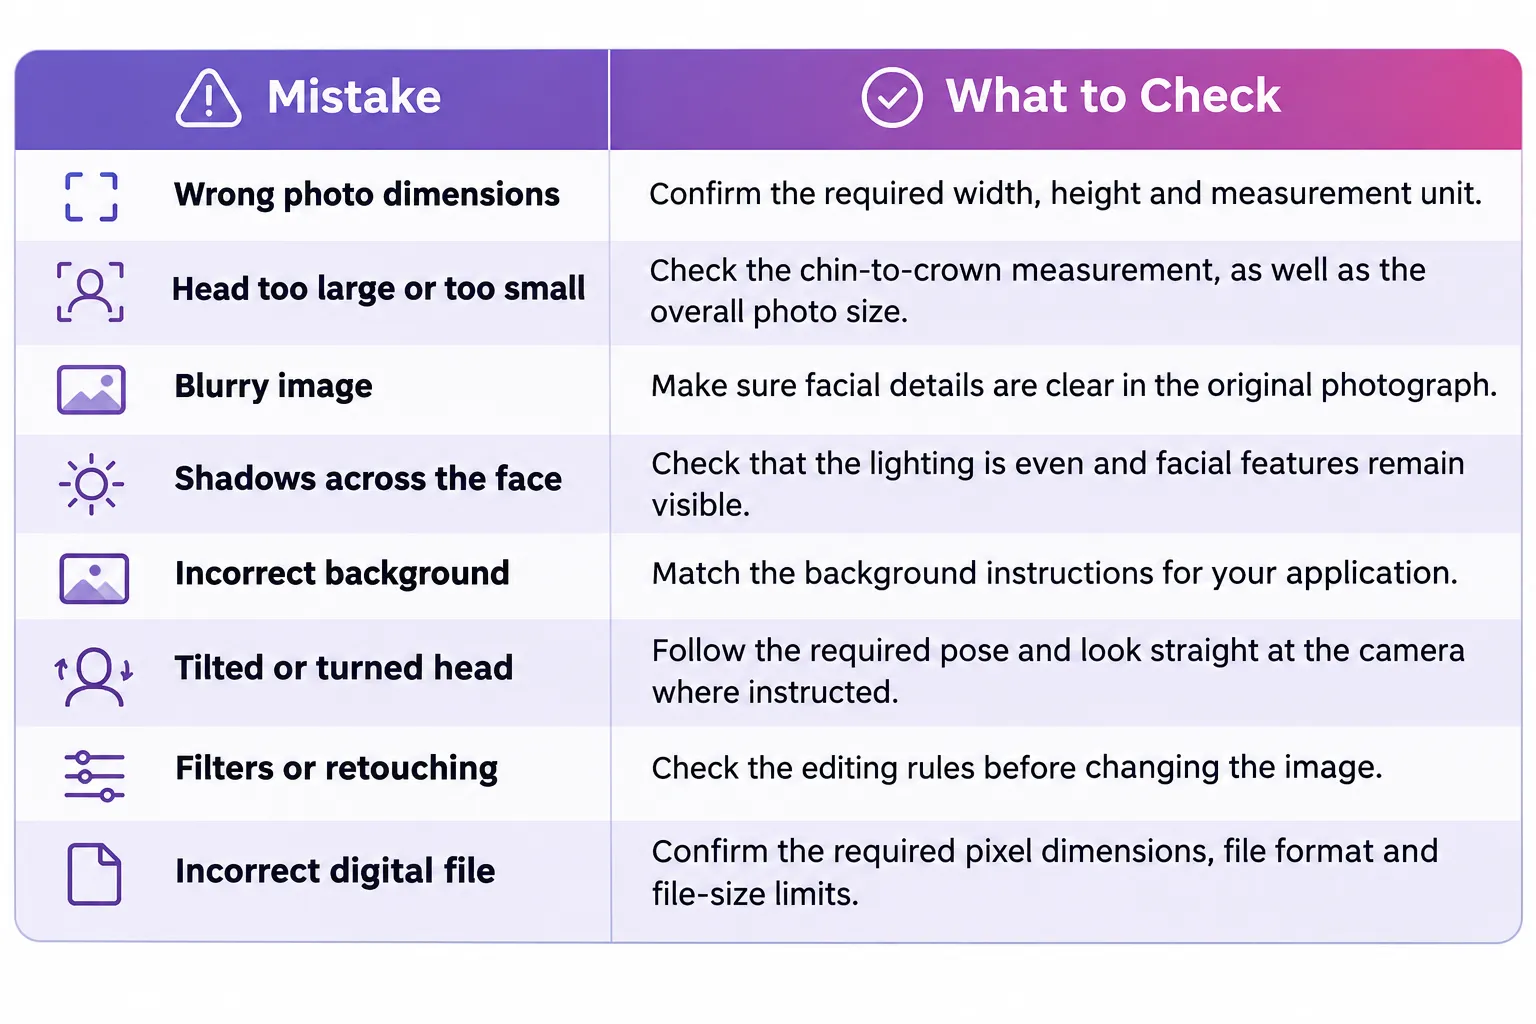
For an online application, compare the saved file with the upload instructions. For a printed application, check the finished print, since printer settings can change its physical size.
Final Thoughts
Getting a passport photo ready starts with knowing what your application requires. Before changing the image, check the dimensions, whether you need a printed or digital photo, and the rules for head size, background and editing.
If you need to convert between pixels, centimetres, millimetres or inches, use the measurements in your application instructions as your starting point. For digital uploads, check the file-size and format requirements too.
Where resizing is allowed, ImgResizers can help you adjust the dimensions. Give the saved photo one last look before printing or uploading it. A few minutes spent checking the details now could save you from having to submit another photo later.