# Photo Print Sizes Guide
A photo can look great on your phone and still be disappointing on paper. Perhaps someone at the edge gets cropped out, or a larger print looks softer than you expected.
Before printing, it helps to check two things: whether the photo has the right proportions for the paper, and whether it contains enough pixels for the size you want. The first affects cropping. The second helps determine how much detail the print can show.
Once you understand that difference, choosing between 4×6, 5×7 and 8×10 becomes much easier. This guide explains the common sizes, the pixel dimensions behind them and how to prepare your photo before sending it to print.
Common Photo Print Sizes at a Glance
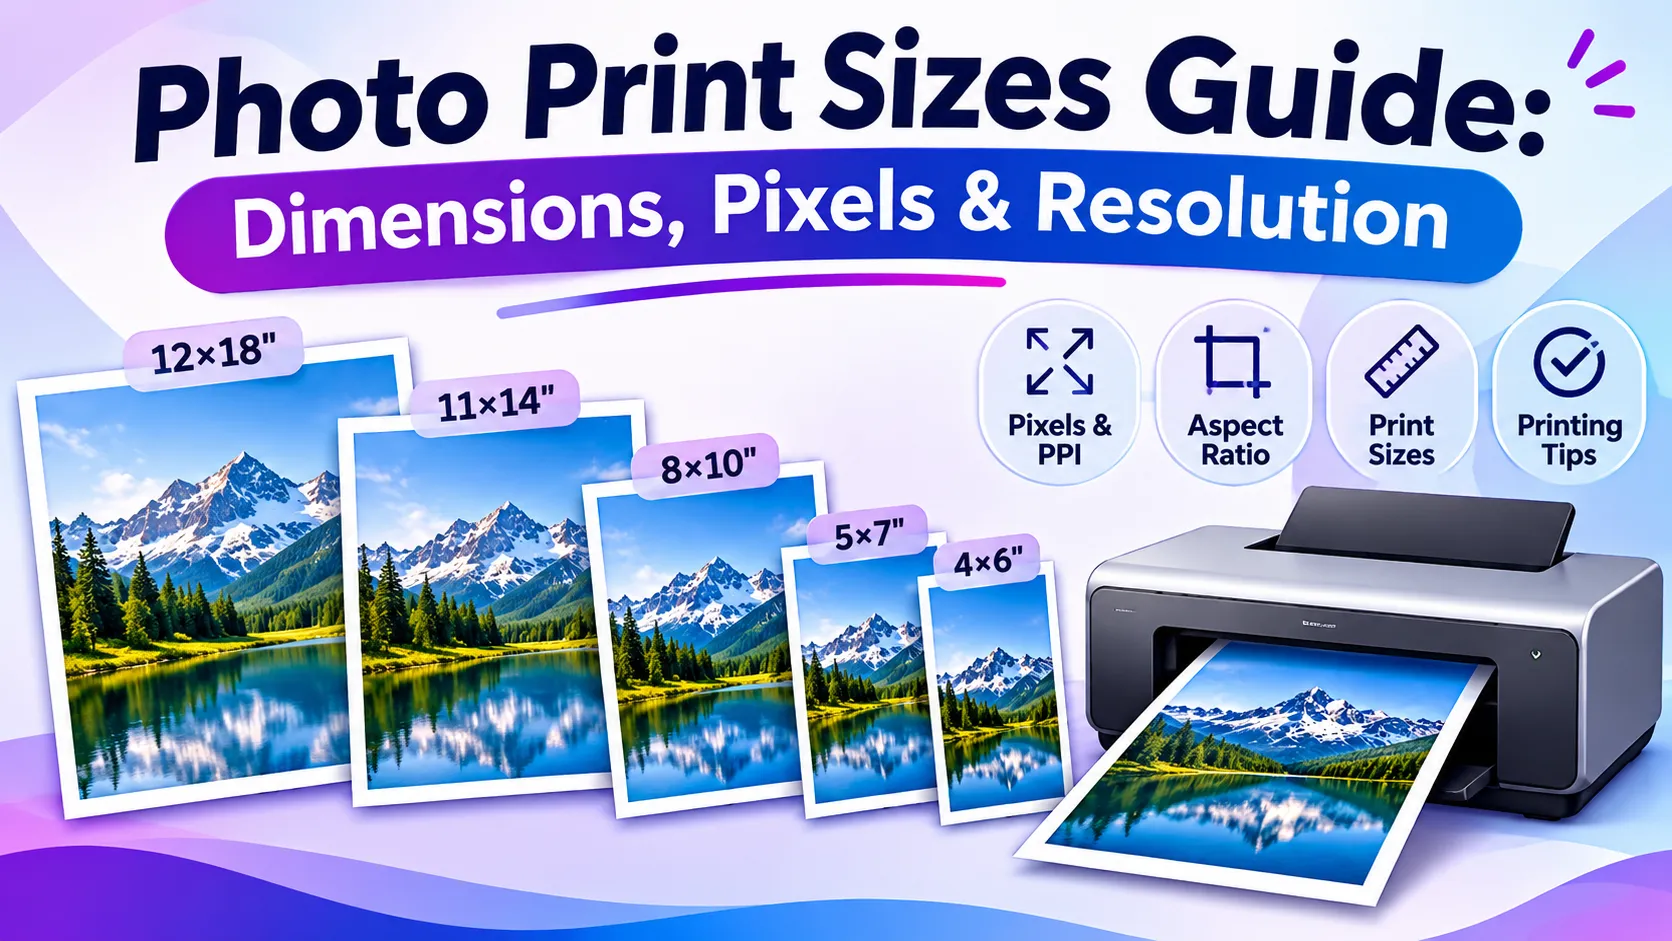
The familiar 4×6, 5×7 and 8×10 formats are useful starting points for albums and framed photos. Larger options, such as 11×14 and 12×18, give you more room for wall displays.
The table below lists sizes in portrait orientation, with the width first. For a landscape print, reverse the width and height.
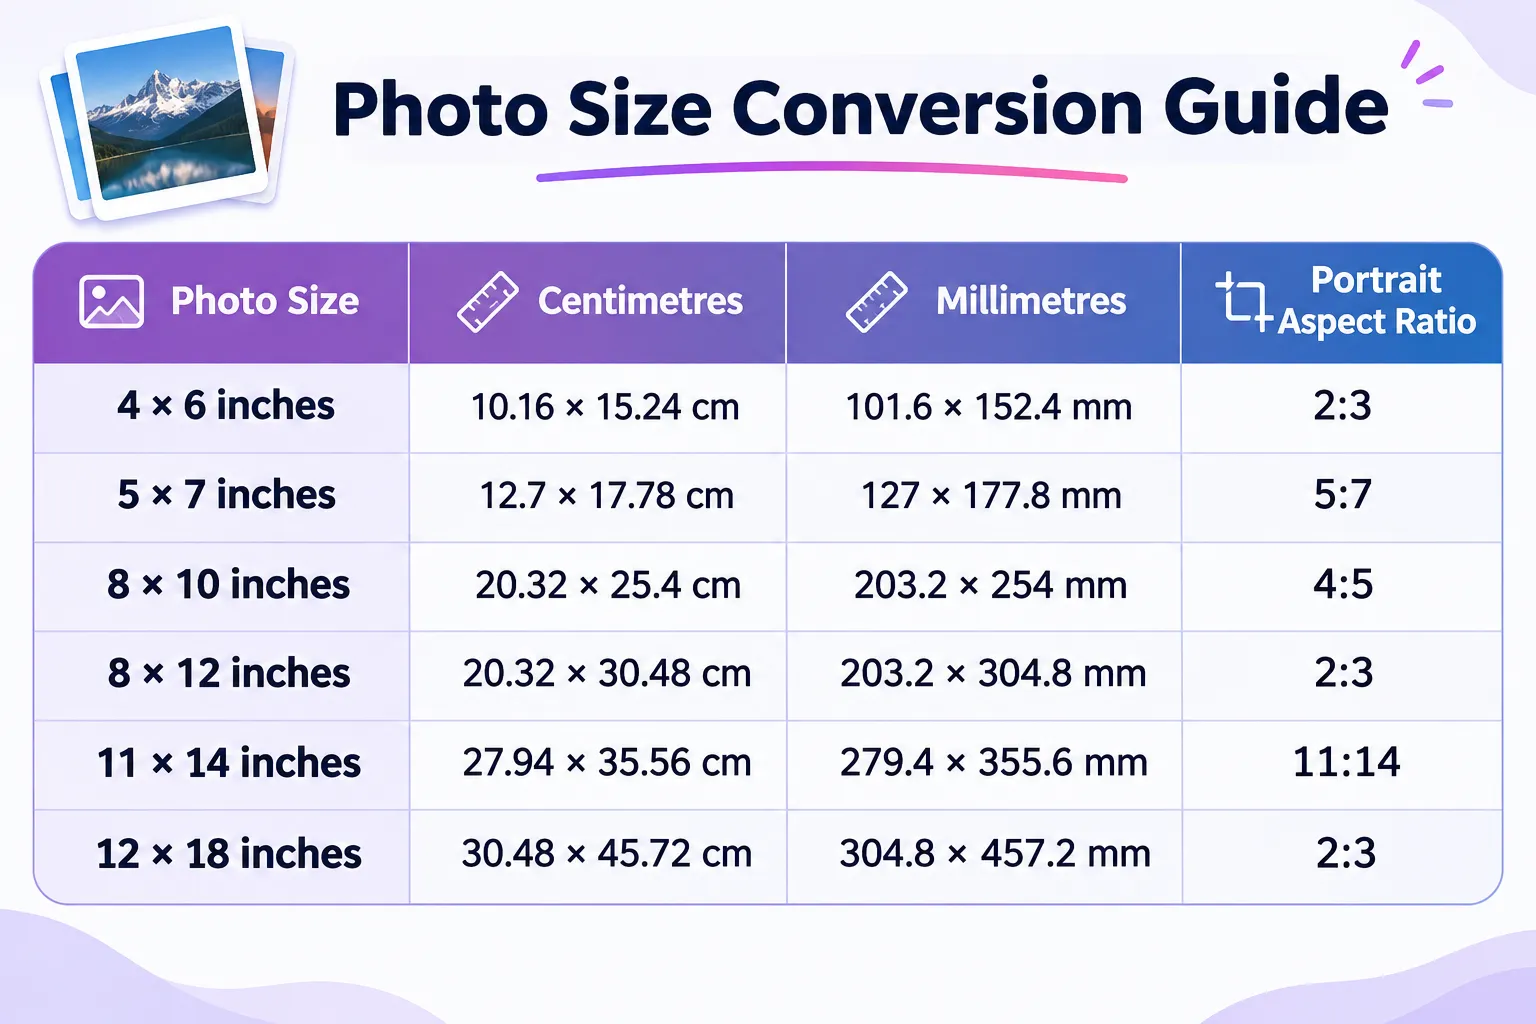
Notice that 4×6, 8×12 and 12×18 share the same proportions. If your photo already fits one of these formats, moving to another doesn’t require a different crop just to match the shape.
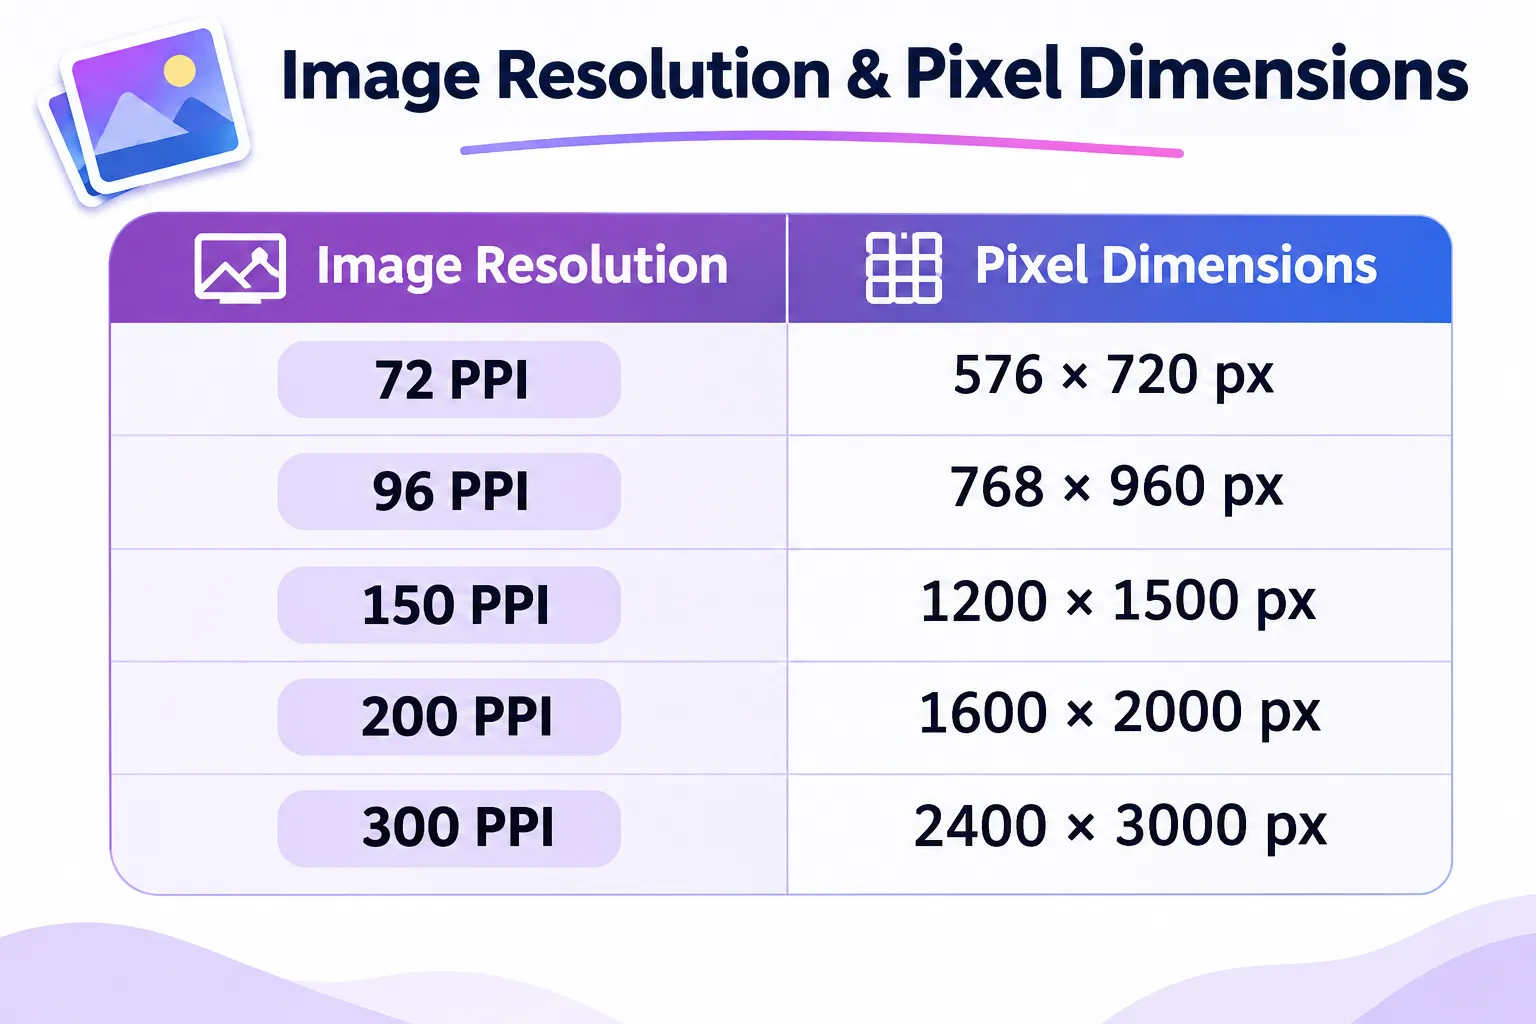
The pixel tables below use PPI, meaning pixels per inch. Many resizing tools label this setting “DPI”; we’ll explain the distinction further down.
4×6 Photo Size in Pixels
A 4×6 print is a practical choice for photo albums, small frames and a collection of holiday or family pictures.
It measures 10.16 × 15.24 cm. In portrait orientation, its aspect ratio is 2:3; turned sideways, it becomes 3:2.
For a 4×6 print at 300 PPI, the image dimensions are 1200 × 1800 pixels.
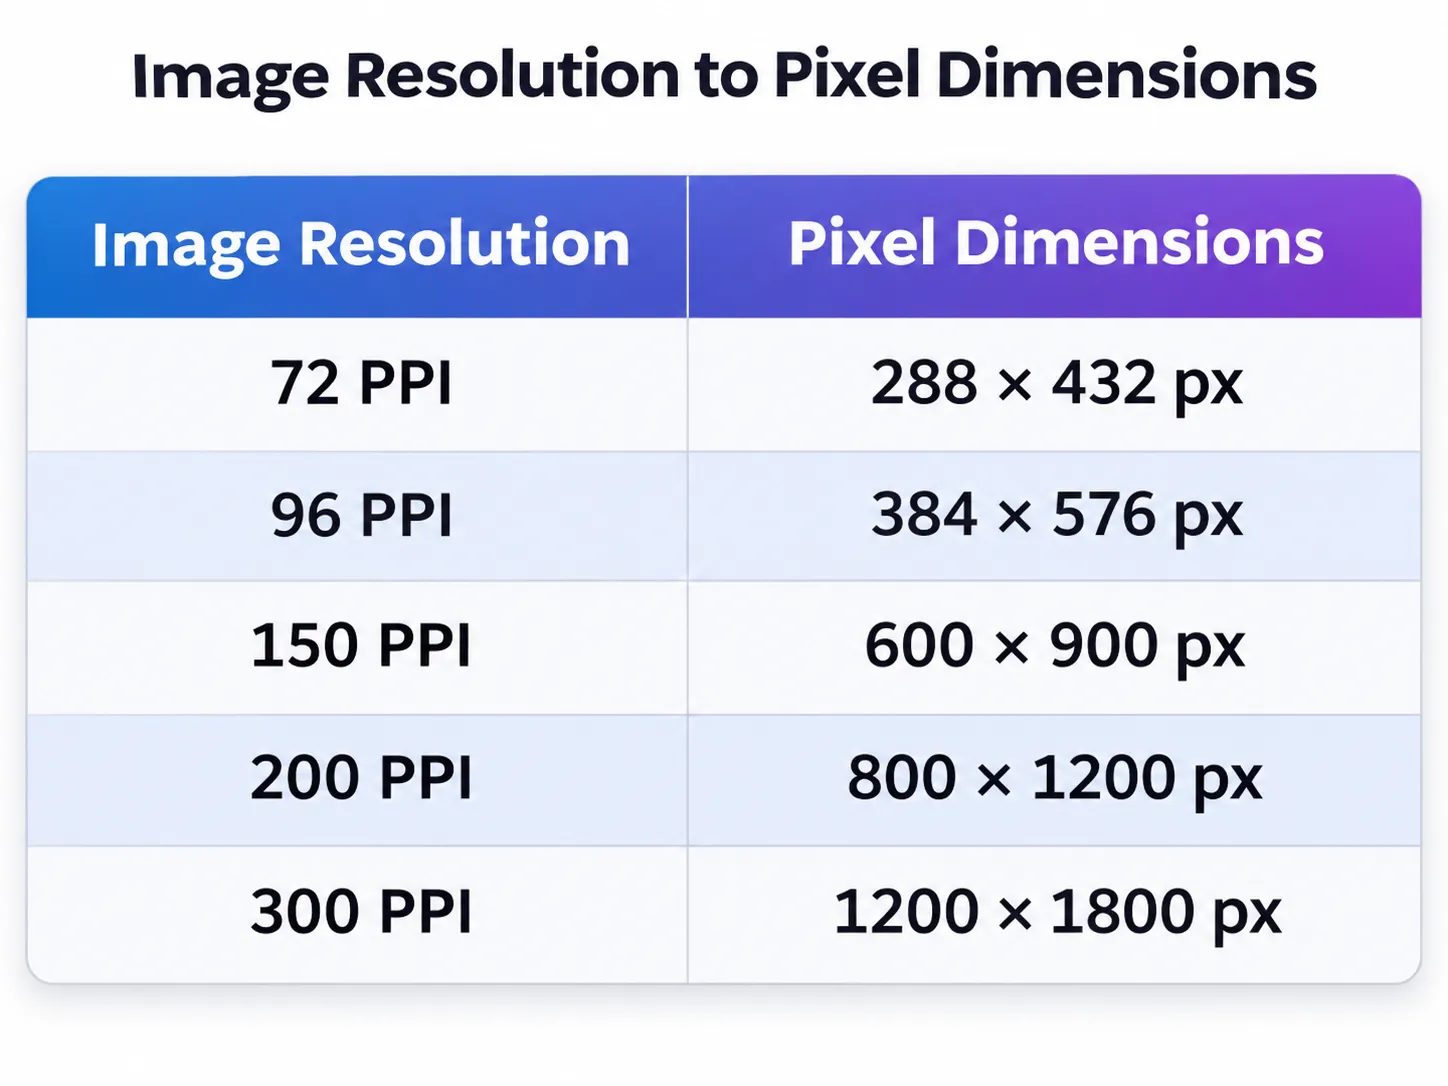
These are calculated dimensions at each resolution. The lower-resolution rows show how the numbers change; they aren’t recommendations for detailed photo prints.
For a landscape 6×4 print, reverse the pixel dimensions. At 300 PPI, that means 1800 pixels wide by 1200 pixels high.
5×7 Photo Size in Pixels
A 5×7 gives a photo a little more space without needing a large frame. It’s a useful size for a portrait on a desk, a bedside photograph or a small framed gift.
The print measures 12.7 × 17.78 cm, with a 5:7 portrait aspect ratio.
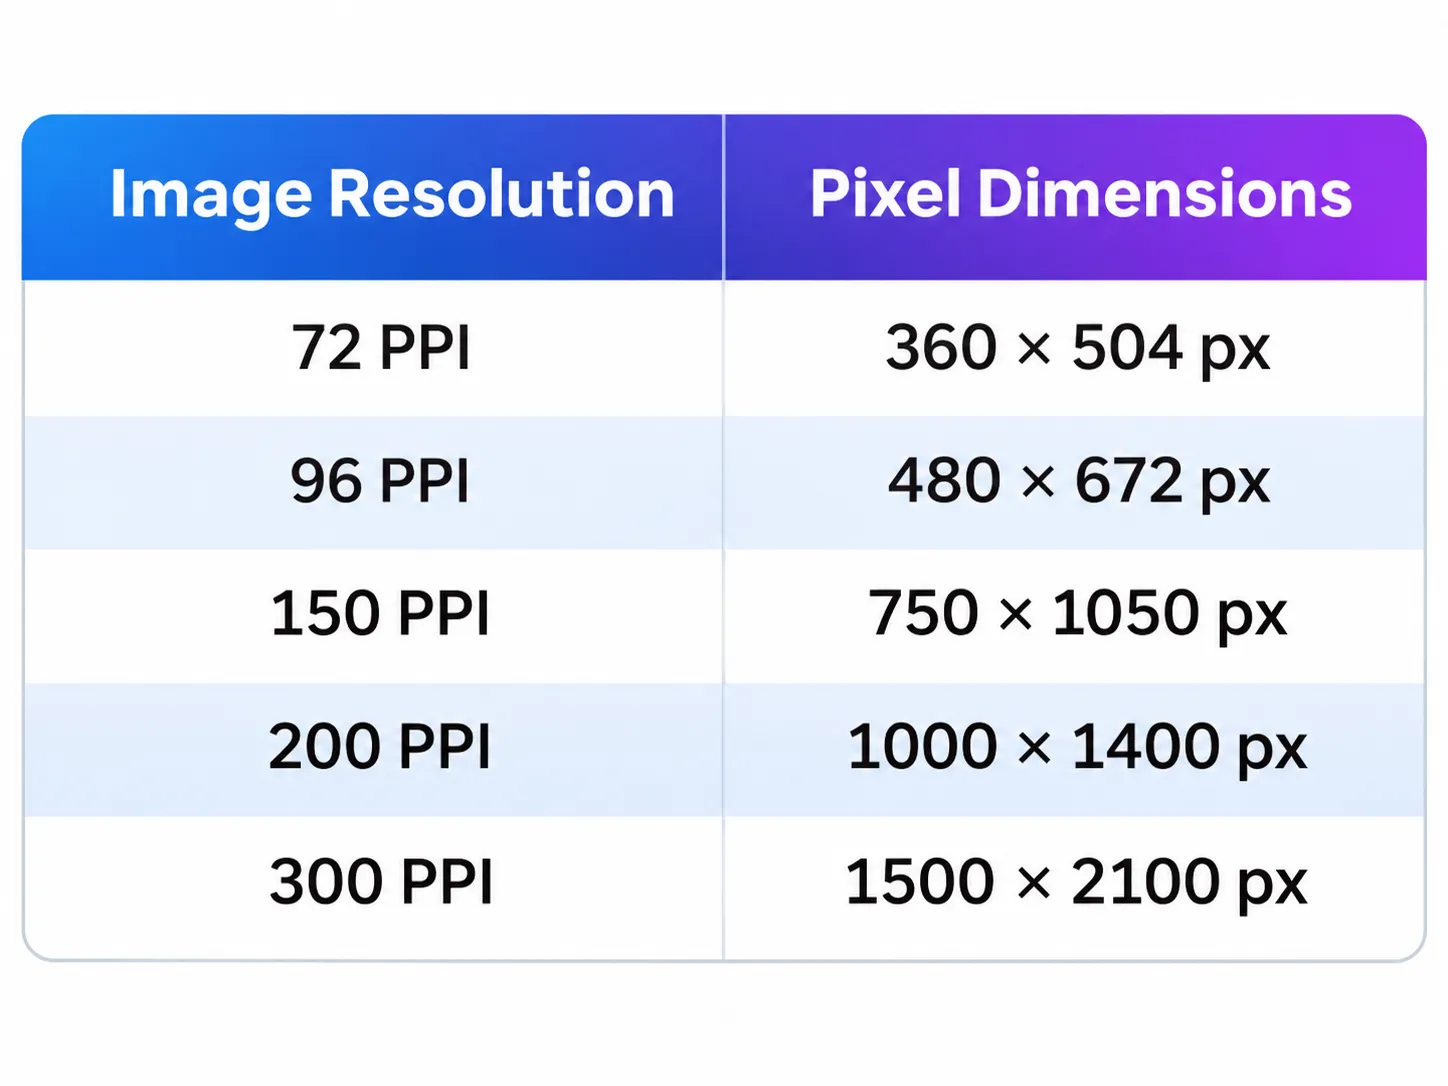
At 300 PPI, you’ll need 1500 × 2100 pixels.
A 5×7 has slightly different proportions from a 4×6, so switching between them can change the crop. Check the preview if your subject is already close to the edge of the image.
8×10 Photo Size in Pixels
An 8×10 works well for a framed portrait or a photograph you want to display on a wall. Its physical dimensions are 20.32 × 25.4 cm, and its portrait aspect ratio is 4:5.
For an 8×10 print at 300 PPI, the image dimensions are 2400 × 3000 pixels.
Pay particular attention to the framing when ordering this size. An 8×10 is wider relative to its height than a 4×6 portrait, so the same photo may lose some space at the top and bottom when cropped to fill it.
If that would cut into someone’s head, feet or another detail you want to keep, consider a border or a print size that better matches the original photo.
8×12, 11×14 and 12×18 Photo Print Sizes
For larger prints, check the image’s pixel dimensions before choosing a size. A photo that looks sharp as a small print may show its limitations when enlarged.
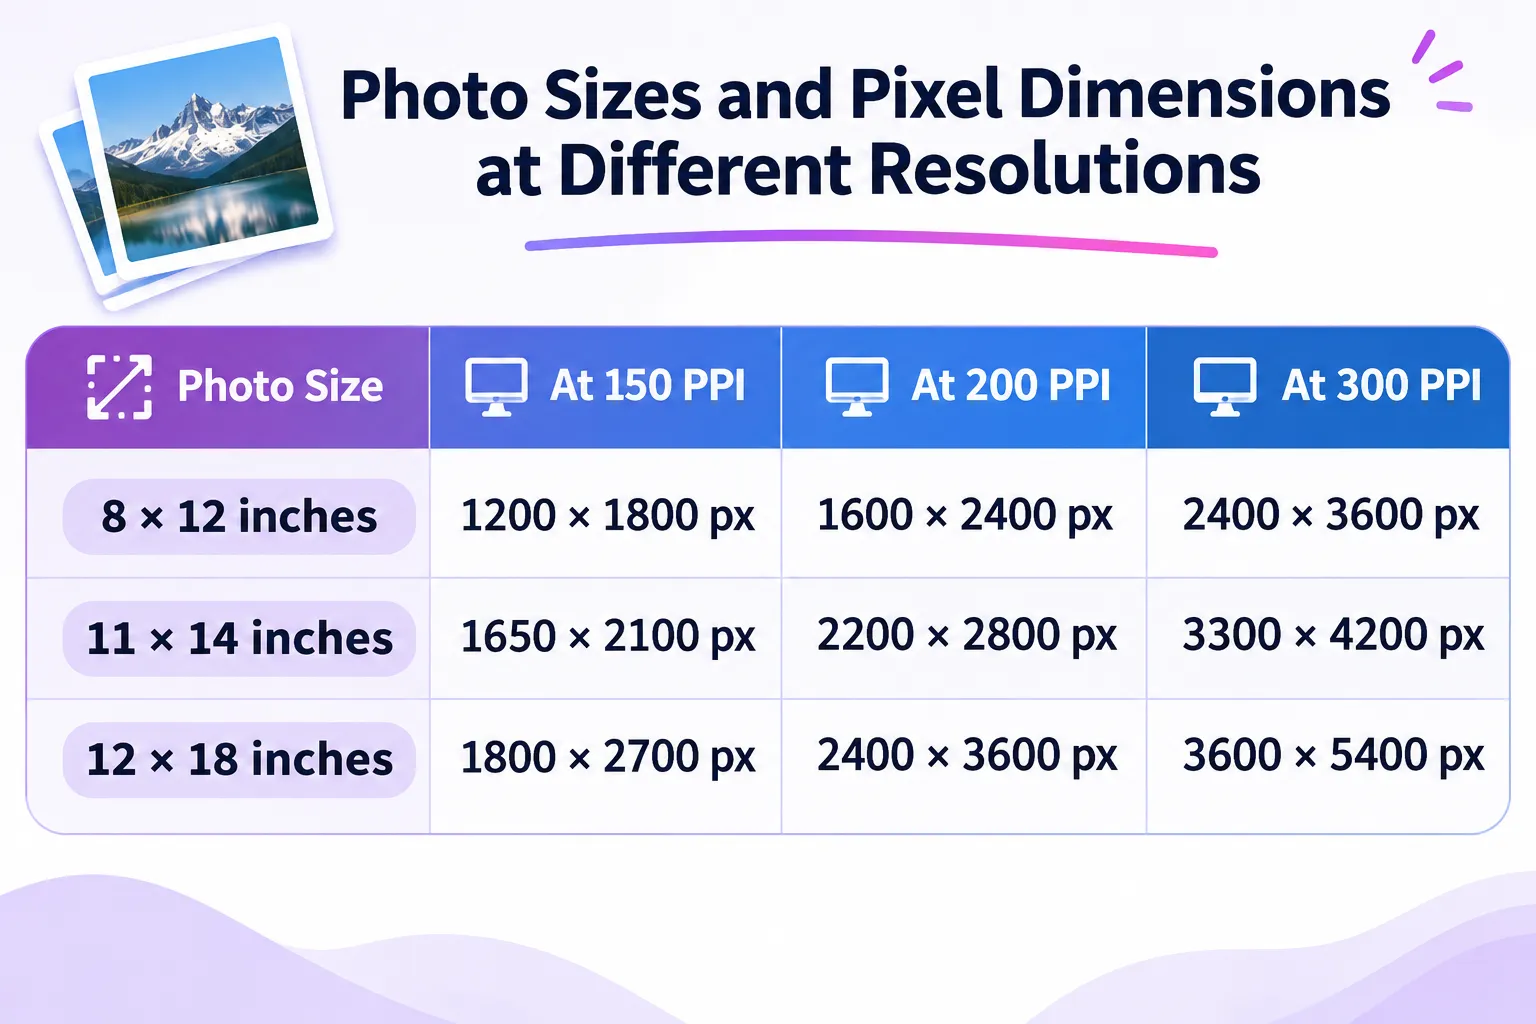
An 8×12 is worth considering if you like the proportions of a 4×6 and want a larger version. A 12×18 keeps those same proportions, while an 11×14 has a different shape.
The dimensions in the table are useful planning figures. Your print service may recommend a particular resolution for its products, so check its guidance before exporting the file.
DPI vs PPI for Photo Printing
DPI and PPI are often used interchangeably in printing advice, although they describe different things:
- PPI, or pixels per inch, describes how many image pixels fit into each inch of a print.
- DPI, or dots per inch, describes the dots produced by the printer.
When you calculate how many pixels a photograph needs, you’re working with PPI. A resizing tool may still call that setting “DPI.”
How to Calculate the Pixels You Need
Use this formula for each side of the image:
Pixels = print size in inches × PPI
For a 5×7 print at 300 PPI:
- Width: 5 × 300 = 1500 pixels
- Height: 7 × 300 = 2100 pixels
You can also work backwards:
Print size in inches = pixels ÷ PPI
For example, a 2400 × 3600-pixel image works out to an 8×12-inch print at 300 PPI.
Choose options when the proportions don’t match.
Crop the Photo
Cropping removes part of the image so it fills the chosen print size.
This works well when there’s extra space around the subject. Check the edges carefully before committing, especially in group photos where someone may be standing close to the side.
Fit the Whole Photo
A fit option keeps the entire photograph visible. Depending on the paper’s proportions, you’ll have borders along two sides.
This is useful when you want to preserve the original composition or when cropping would remove something important.
Add a Background
You can fill the remaining space with a solid colour or, if your editor supports it, a blurred version of the photo.
That becomes part of the design, so consider whether it suits the print. A plain border may be enough for a traditional framed photograph.
Print services handle cropping differently. Check the service’s final preview even if you’ve already prepared the image yourself.
Resize a Photo for Printing with ImgResizers
Once you know the print size you want, ImgResizers can help you prepare the dimensions. Its custom dimensions tool accepts pixels, inches, centimetres and millimetres, and includes a DPI setting. Change Size of Image Online
To prepare your photo:
- Open the tool and upload your image.
- Select the measurement unit you want to use.
- Enter the required width and height.
- When working in physical units, choose the resolution recommended by your print service.
- Check how the photo fits. Preserve its proportions and use a crop or fit option where the selected tool supports it.
- Choose an output format accepted by your printer or photo lab.
- Download the image and check the saved file’s dimensions.
For a portrait 4×6 print, enter 4 inches for the width and 6 inches for the height. At a resolution of 300 pixels per inch, that corresponds to 1200 × 1800 pixels.
For a landscape version, swap the width and height.
If the print shop gives you exact pixel requirements, you can enter those directly. There’s no need to convert them into inches first.
Common Photo Printing Mistakes to Avoid
Before sending a photo to print, check more than the size label.
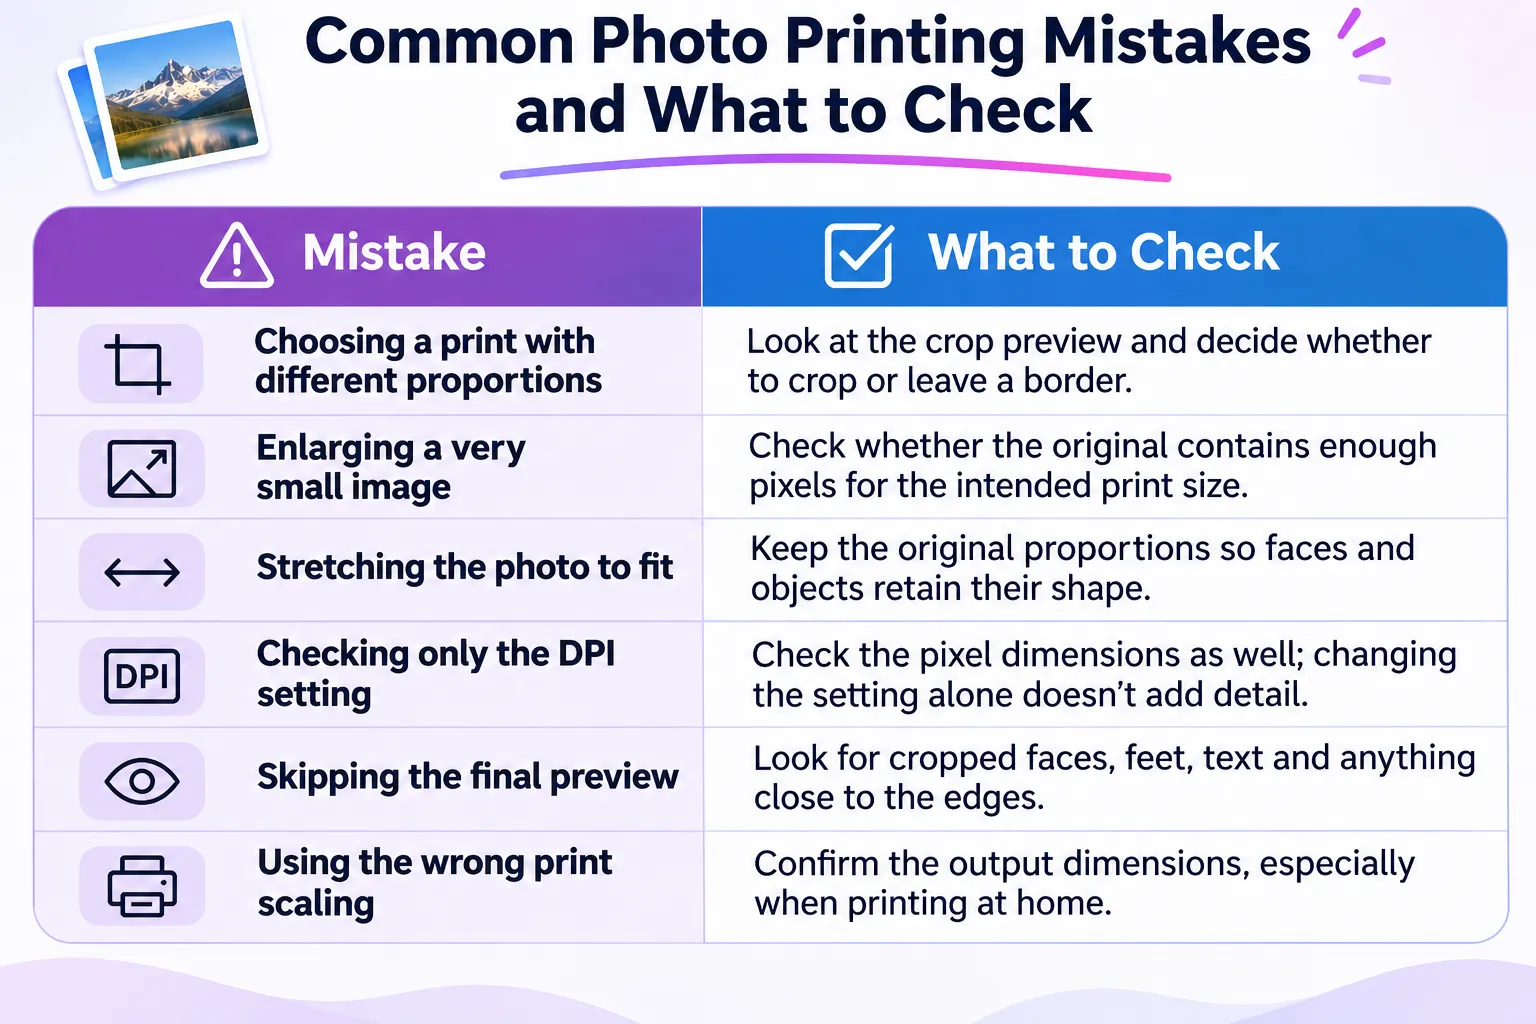
If you already have a frame, check the photo size it accepts before ordering. The frame’s outside measurements won’t tell you the size of the print that fits inside it.
Final Thoughts
Start with where the photo is going. If you already have a frame or album, check the print size it needs. If you’re still choosing, look at the photo’s proportions and how much of the image you want to keep.
Then check the pixel dimensions and your print lab’s resolution guidance. If the photo needs adjusting, ImgResizers can help you prepare it in the units you prefer.
Before printing, take one last look at the crop. Check faces, edges and small details that might disappear. It’s much easier to make that adjustment on screen than to order the same photo twice.